With some surprise I sometimes watch when someone in a music store is going to test a guitar and / or amplifier. The instrument is plugged in immediately and the distortion on the amplifier is set as desired. Then some virtuoso riffs are played (after all everyone listens) and they think they have formed a good judgment.

In the future, wait a while before connecting and perform some checks first.
First take the time to take a critical look to get a first impression. In practice, you will pay particular attention to the eye-catching damage and check whether the various parts match the rest of the instrument. Play it without amplification and try to find out how it "feels and sounds". Then it is time to do a little step-by-step research.
Perhaps the points below can help you with this.
| General impression | Screws | |||
| Logo | Head and neck | |||
| Tuners | Topnut | |||
| Neck and truss rod | Frets | |||
| String height | Intonation | |||
| Pickups | Bridge | |||
| Pickard | Potentiometers and switches | |||
| Plug | Body | |||
| Lacquer | Practice |
Screws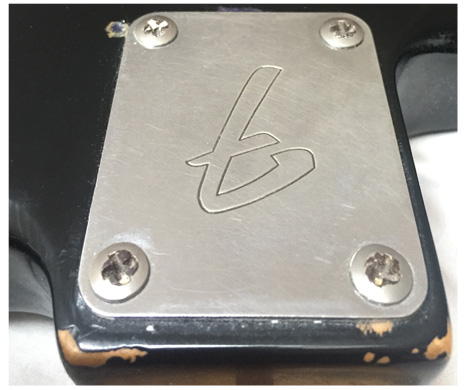
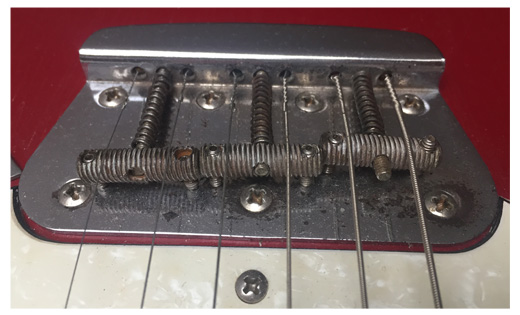
You can often tell from the screw heads whether they have regularly seen a screwdriver during their lifetime. Think of the screws of the machine heads, the pickguard, the bridge and those of a possible neck plate. When they have been loosened regularly, this can be an indication that there has been "messing around" inside.
The screws may have been replaced in the meantime, but they may contrast with the rest of the metal parts or have a different "head" than it should have originally been.
With the pickguard it is sometimes the case that the top row looks a bit duller / rusty because a sweaty hand or arm has regularly passed by during play. This may also be the case at the top of the bridge. Note that with an older instrument where all screws are still in their original position, you see that in such places they have a different "shine" (or no shine at all). Perhaps a reason to put each screw back in its own place in the future.
Head
There is a logo on the head as standard. Sometimes it concerns a kind of sticker that has already been painted over from the factory, such as the Fenders. From the side you can see that it is a sticker that is slightly larger than the brand and type name. The whole is actually on the wood and covered with clear lacquer. It is possible that multiple stickers have been used, for example one with the brand name and additional stickers with pictures and texts. Classic logos are now available separately and can also be glued on afterwards, see if the original paint layer still covers everything and if there are no folds or bumps in the thin sticker material. Via the internet you can find out whether the layout of the whole is correct and indeed belongs to the relevant year of construction.

A brand name inlaid in "mother-of-pearl" may provide a little more support. It is, as it were, in a recess milled into the wood. I have come across guitars where such inlaid logos came off a bit, perhaps by chance but those times it was always old Guilds. We will stay with the head. If you lay a guitar with its back flat on the ground, the head may not hit the ground and "float" slightly above it (as is the case with most Fenders). For example, several Gibsons have the headstock diagonally backwards and the tip before the guitar lies flat will touch the ground. The body will not lie flat because the head touches the ground earlier. What does this have to do with inspection? the risk of breakage or tearing is not small, this will almost always have happened just behind the nut, so just a little past the end of the metal neck pin (see red frame on the picture). - and / or the back of the head can be seen Turn the instrument slightly to reveal a crack or incipient fracture using the light, or you may see that a previous fracture has been repaired When that happened neatly and well, how that shouldn't be a problem. The price must then be adjusted to that.
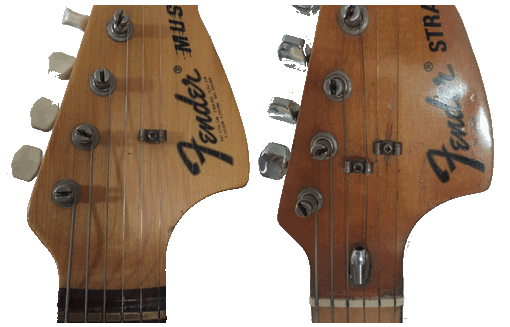
Depending on the model and year of construction, for example, a Fender has 1 or 2 string guides on the head. To properly press the strings on the nut, there is a kind of bridge screwed for the B and high E string. Around the place where it is fixed you sometimes see cracks or filled holes. A belt guide can also be mounted for the middle two strings. Whether this should be standard depends, as said before, on the year of manufacture and model.
Often string guides were only added afterwards to properly press the D and G into the nut. Something that is not really necessary if you give the string enough turns to the mechanism. Just make sure when mounting strings that there is enough length to turn the string several times around the axis of the mechanism, so that it automatically lies lower and is therefore well pressed into the nut.
Tuners When the guitar has already been tuned, you are actually not that inclined to turn the tuners. Still good to detune each string one by one and then to tune it again. You will only notice how the mechanisms function and whether there may be any play. You also immediately test whether the strings move smoothly through the recesses in the nut and how the bridge responds to this. Is everything still in a good mood after a while? The tuning can change especially after pressing the strings.
When the tuners are replaced, screw holes of the previous ones can sometimes still be seen. You may have the plan to restore original machine heads in the future, but this will only be the case if the holes in the head were not widened at the time to make them suitable for the new machine heads. And I mean the holes through which the mechanism completely protrudes.

Plastic buds can burst and sometimes the plastic seems to have deteriorated. Pieces can break off and you may even turn the knob without the axis moving.

Topnut
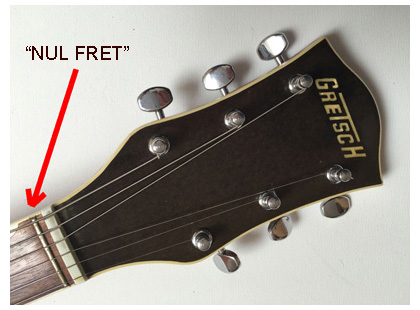
The height of the strings should be about the same at that spot as if the nut is just a fret. In practice, the string height will be slightly more there. There are also guitars where an extra fret is located just behind the nut, which determines the height (a so-called zero fret, see photo).
To check, press a string in the first position and then look at the space between that string and the next (2nd) fret. The space must be approximately the same with a non-pressed string (which is therefore simply in the nut) and the 1st fret. Slightly more space is also fine, but less space could have the effect of causing the loose strings to rattle. It is then necessary to replace the comb. Excessive recesses in the nut can also cause noise because the strings can move back and forth. Strike the strings as a test without pressing them and check whether there is any play in the recesses. The chosen string thickness also plays a role.
When the strings are too high, this is negative for the playability and also has some effect on the intonation (pure tones). Strings that are too low will have the side effect of "clattering" on the frets if they are not pressed. Replacement of the comb would seem necessary, but as an emergency I sometimes have a file from an old piece of nut that I still had are filed off a layer and with the help of the collected dust, diluted with superglue, the slot in the problem nut is slightly raised, then update the raised slot and it will last for years.
If the comb is still original, you should expect that the distance between the strings is in proportion to each other. Also the space between the outer 2 strings and the end of the nut must match. When the comb has been replaced in the meantime, the distribution of the strings over the width may be less well chosen. The slots are often fitted as "custom" when replaced and this seemingly simple job requires some accuracy.
Truss rod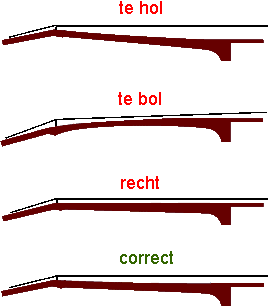
A guitar with metal strings normally has a truss rod. This prevents the neck from bending too much due to the tension of the strings. The pin is adjustable to correctly adjust the curvature of the neck. If you decide to install thicker or thinner strings, the pin may have to be adjusted again. In advertisements you often read that the neck is "straight", but that is not the intention. A neck should actually be slightly "hollow".
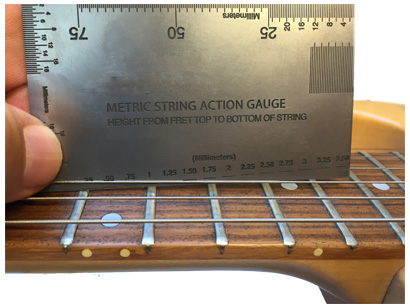
The best ruler to measure that is to use a string to check it. Press a string on the first fret and simultaneously with your other hand on a fret somewhere near the body. Exactly between those two places you can see what the space between the string and the fret (s) in between is. The tense string forms a straight line and with the fret there is exactly some free space in between. See the picture: so press the string on both frets at A and B and check at C the free space, which should be approximately 0.3 to 0.4 mm, approximately the height of a thin cardboard. Use a so-called 'feeler gauge' to measure accurately or purchase a kind of ruler that is sold as 'String Action Gauge'. At an initial check, that value is not so narrow, but you just want to know if there are 'suspicious' deviations So the string should not touch the fret in the middle, the neck is straight or bulging.If you have the feeling that you are short of hands, you can put a capo on the first position which the strings already have before you press the first fret.
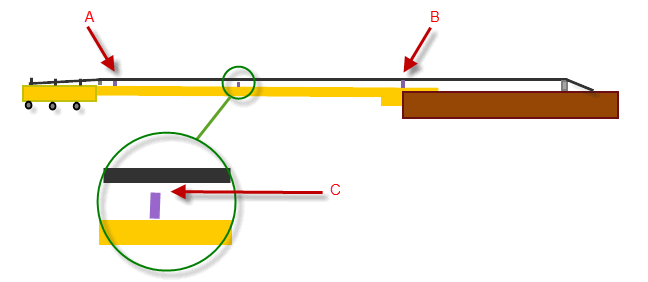
Test this at least with the two outer strings, or with the low E and high E. The distance between the "middle fret" and the string must be identical for both strings. It may be that the neck is too hollow, but then the deviation must be the same for both the thick and the thin E string. If not, the neck is "twisted". Difficult and not easy to correct, someone has to compensate by removing wood from the fingerboard or the metal of the frets.
When the space between the string that serves as a ruler at that moment and the fret in the middle is just too big, the neck should be less hollow. But be aware, this can also be an indication that the pin is broken and that the tension of the strings has pulled the neck completely hollow. A repair that is necessary in that case will be difficult to carry out and is quite expensive. To check whether the pen really no longer functions, you can carefully loosen and re-tighten it. You then notice whether you feel any resistance, which should be the case. I once owned a Gibson where you could even hear the broken pin "rattle" inside the neck.
If you need a so-called Allen wrench to adjust the neck pin, use tools in "inches" for American and English instruments. A hardware store Allen key in mm differs slightly so that it just does not fit properly and can therefore even damage the screw head.
Neck

Damage to a guitar is actually a pity because they are visible but do not have to be noticeable while playing. In my opinion, this certainly does not apply to napping or deep scratches on the back of the neck. I get annoyed when I always go over tangible damage with the thumb or palm in the same positions. Paint that has been worn evenly is not a problem in my opinion.
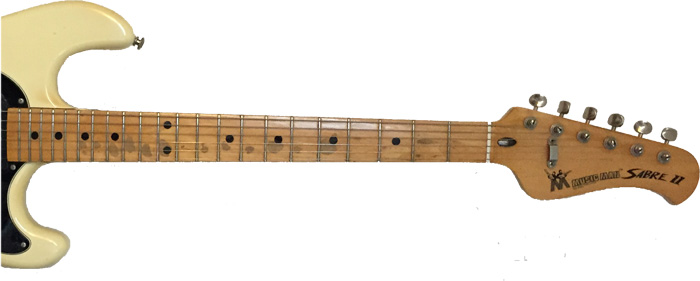
On the side where the frets are, the lacquer may have worn off with a lacquered "maple" neck. This does not have to be disturbing.
If the color of the wood (lacquer) between the frets is very different from the rest of the wood, this can be an indication that the frets have ever been replaced and the neck on that side is immediately repainted.
A "rosewood" (rosewood) or "ebony" (ebony) fingerboard will not be painted. Special oil is sometimes used to prevent the wood from getting too dry. A refret job on these necks can sometimes leave traces in the form of small pieces of wood that have "jumped off" right next to the frets.
When the guitar has been used a lot, the wood can be worn between the frets and a kind of washboard has developed. This will be the case especially in the lower positions near the head. You can expect the frets to show clear signs of wear in those places. Unless they have been flattened or have already been replaced.
When it comes to a neck with bindings (plastic strips along the edge), it is advisable to check whether they still fit seamlessly and that they do not have any cracks or sharp edges. Plastic shrinks over the years and can be a point of attention for both playability and appearance.
Frets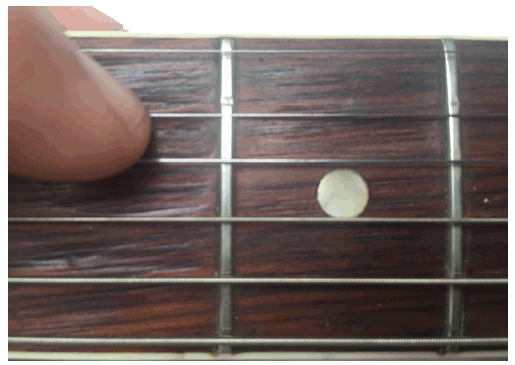 First I feel by sliding a thumb over both sides of the neck or the ends of the frets don't feel too "sharp". This also occurs with instruments that have just left the factory and this does not necessarily mean that they have been replaced. I find it annoying. Frets wear out and in practice this can be seen mainly in the first positions. Check that this does not result in the strings "clattering" in some positions. After all, an ingrained fret has become lower and the vibrating string can then hit the next fret. Move from position to position on each string and always strike the string to hear if it can vibrate freely without noise. Do this especially in all places where wear is visible. If the wood between the frets has worn away here and there but the intermediate frets still look fine, a refret may have been performed. See the attached photo, where there is clear wear on the frets under the string and the wood between the frets is partly worn.
You can replace worn frets, but flattening may be an option first. Of course you can only do this when every fret still has enough "height". Such a treatment can only be repeated a limited number of times and you will still have to think about replacement at some point.
Several times I have come across that some frets are slightly higher than the rest. It then seems as if the fret is not far enough in the neck. You then have places where the strings touch slightly without wear on the fret. You can then set the strings extra high to prevent rattling in those places, but it is much more pleasant to lower those frets in those places. Leave this to the expert.
String height
You can usually set the height yourself and this seems to be something that does not matter during your first checks. However, due to the very high strings, it is not possible during the tests to determine whether "rattles" can occur after deviating in frets. You also do not know whether the bridge can still be adjusted to achieve a desired height. With a screwed neck you can tilt the neck slightly, but in the case of a glued neck you will run into a problem.
Als indicatie voor de bruikbare hoogte van snaren op een elektrische gitaar houd ik 2 mm (lage E) en 1,6 mm (hoge E) aan. Hiermee bedoel ik de ruimte tussen de snaar en de fret op de 12e positie, zonder dat je op de snaar drukt. Bij de dikke E snaar moet die vrije ruimte ca. 2 mm bedragen en bij de hoge E ca. 1,6 mm. Om dit te meten zijn speciale liniaaltjes verkrijgbaar. Maar tijdens de inspectie komt dat nog niet zo nauw, je wilt dan eigenlijk alleen weten of de snaarhoogte op dat moment niet te sterk afwijkt. Tijdens het definitief afstellen later kan de afstand alsnog nauwkeurig worden bepaald.
Strings
Strings are easy and inexpensive to replace, so you would think that you do not have to pay attention to it. But the sound is partly determined by its quality and condition. Keep in mind that strings that are old and dirty can also affect intonation (see also below), making it difficult to make a good judgment. And when they are rusty, this will certainly be reflected in the playing comfort. If your preference for the thickness of the strings is very different from what is currently on it, the neck will need to be readjusted. Sometimes it takes some time until it is correctly "set" again. Check that the string slides smoothly through the nut while tuning.
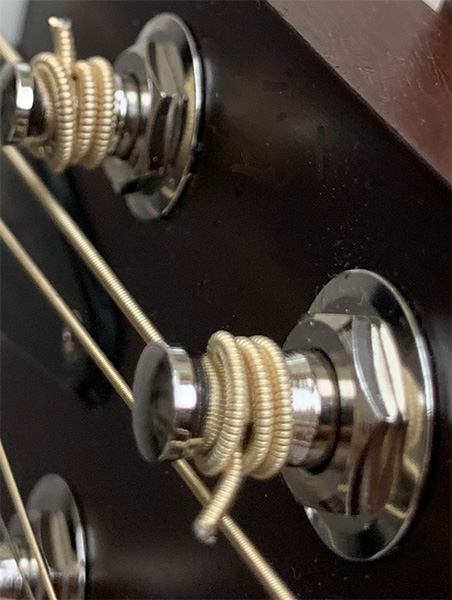
And then a tip when you replace the strings. If you put them neatly around the mechanism for a few strokes, tuning will be easier and you will also have less discomfort from detuning. I always run the first turn above the hole of the string and the next turns below. The end of the string is then clamped between the windings, as it were. The photo shows what I mean better.
I have come across copies where barely one turn had been made. In addition to the risk of detuning, it is also the case that the angle that the string makes over the nut is too small. This can cause clattering noises.
Too many windings where the string even goes over itself makes tuning difficult.
The best approach for removing the old set is to cut it so that you can easily disassemble it.
I cut off the piece of string that protrudes so that they do not get caught when you put the instrument in a case, for example. And especially the thinnest strings can sting annoyingly when you are not paying attention. And I would rather not say anything about strings that are still dangling at the head for another half meter.
Intonation
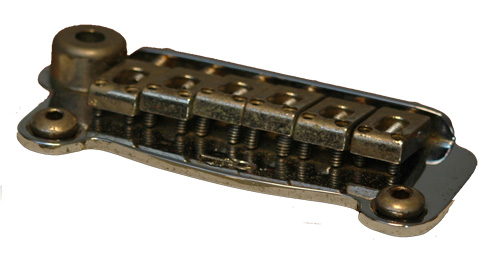
With several bridges you can set the length of each string (or per two strings as with some older Fenders, including the Telecaster). Due to the length between the nut and the bridge, a string is set octave clean. This is partly influenced by the height of the strings and the curvature of the neck, so that they must first be put properly. The thickness of the strings is also decisive, so make sure that there are strings with the thickness you want.
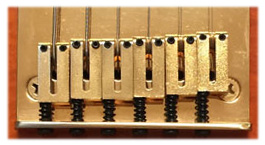 To check for each string, test to make sure this so-called intonation is correct by striking an unpressed string and then repeating it again with the string depressed at the 12th position. That tone must then be exactly one octave higher. Preferably use a tuner to check this. Instead of striking the loose string, you can also compare a flageolet above the 12th fret with a pressed string at the 12th position, which must be completely identical in pitch. If the pressed string on the 12 fret sounds too high, lengthen the string by moving the saddle backward. If the pressed string is too low, you must of course shorten the length between the saddle and the nut. In practice, the pattern of the saddles will usually follow an approximately oblique line with the thinnest string being the "shortest". See picture.
When you notice in the music store that a guitar is not octave pure, you can of course ask to adjust the instrument (and then immediately with your favorite strings).
Pickups
In fact, an element is just a combination of a magnet and a coil. These react to the vibrations of the metal strings and convert that into a stream. But if you strike a string, you may not immediately know which pickup the sound is currently picking up, and whether multiple pickups are active simultaneously. To test the operation in combination with the switches and potentiometers, you can use an old-fashioned tuning fork. Strike it so that it vibrates, then hold it close to an element. This way you can check exactly where that element picks up the sound. You can also check with a humbucker whether a "split" option is active, with half of the element switched on and functioning as a "single coil". Use the switches and potentiometers to check the operation immediately. It goes without saying that an amplifier must be connected to these checks.
Elements can be "microphonic". You then notice by tapping that this gives a clearly audible sound from the amplifier. This is often caused by the fact that in the coil, which consists of thousands of turns of very thin copper wire, no wax or lacquer has been used to keep the whole together vibration-free. The chance of howling and noises will then be somewhat greater. Some (old) elements suffer from this as standard and you will have to take this for granted if you want to leave everything original.
The height of the elements can often be adjusted. You can thus influence the distance between the strings and the elements. The closer together, the more output. You might be inclined to place the pickups as close to the strings as possible, but that doesn't necessarily produce a better sound. Strong magnets in the pickups, which then move closer to the strings, can adversely affect the strings and sound. Experiment with your guitar on your own amp to determine the height at which you like the sound best. Consider the relationships between the elements, so that the volume and sound match when you switch. Also note the ratio in volume between the thick and thin strings. It is therefore possible that the elements are slightly tilted with respect to the body in order to obtain the correct balance.

A guitar may have been equipped with other elements in the past. To make room for this, it is sometimes necessary to make or enlarge recesses in the body. Because these holes often fall under the pickguard, it is not possible to see if any wood has been removed there. Unfortunately, the pickguard has to be removed to check this. Do not be surprised when you see that something has been cut away here and there.
Bridge
A few things have already been said about the bridge above. See if the bridge is still adjustable and that there are no "lame adjusting screws". A lot of rust in those places often makes setting difficult.
It may be that the bridge also serves as a "tremolo" (it should actually be called "vibrato", but it is often incorrectly called "tremolo"). original position. Tune everything well before use and then this should not be disturbed again once the bridge returns to its position. Immediately check that the strings do not get caught in the saddles or the nut while moving the "tremolo-arm". A so-called "Tremsetters" is commercially available, which can also be installed acteraf in place of one of the springs.
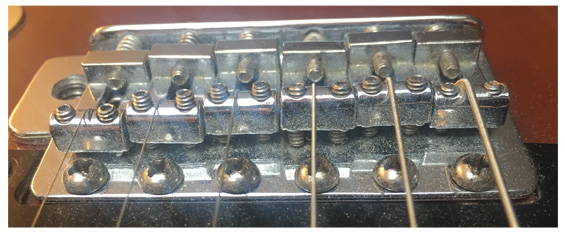
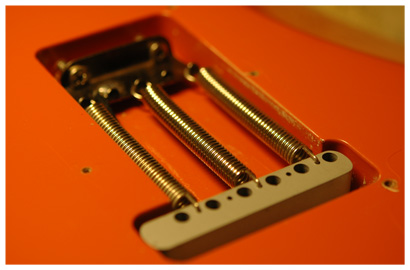
Usually, to allow for some movement of the bridge, a row of six screws that are not fully tightened has been used. Think of the versions as applied to the Stratocaster. However, someone may have tightened the screws completely causing the tremolo to shut off. I have also come across that a block of wood in the space in the back where the coil springs are located blocks the tremolo. In itself not a wrong solution if you do not want to use it and prefer to keep everything in the best possible mood. This also prevents the rest from getting out of tune after breaking one string.
When moving the tremolo arm, it may be that you feel that too much force is required, or that it happens too smoothly, so that you activate all the effect undesirably with a light pressure on the bridge. Fortunately, the number of coil springs that control the counterforce can often be adjusted. It may also be possible to adjust the resilience by further tightening them or loosening them if desired.
Pickguard
Additional holes for switches or wider recesses for other elements can be made in a pickguard. You might not expect it, but plastic can shrink over the years, I have come across several 1960s Fenders who are bothered by that. The pickguard is then no longer tight on the body and has a somewhat "wavy effect" seen from the side. The screws therefore no longer seem to be noticed. In itself, this does not have to mean anything special.

Did you know that Fender had a period in the 1970s when the serial number of the guitar was also on a sticker under the pickguard? The visible number on the head of the neck corresponded exactly to this.
Potentiometers and switches
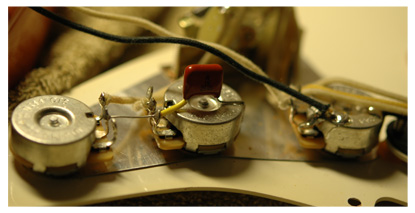
These are notorious for being a nuisance to crack during use. Whether it is "temporary dirt" or if there is wear, you can sometimes find out by turning the pots completely back and forth a number of times. When the cracking does not decrease or stops, replacement may be necessary. Spraying contact spray in the potentiometer or on the contacts inside the switches often works wonders.
Check that all pots and switches are working correctly. The aforementioned tuning fork trick can help.
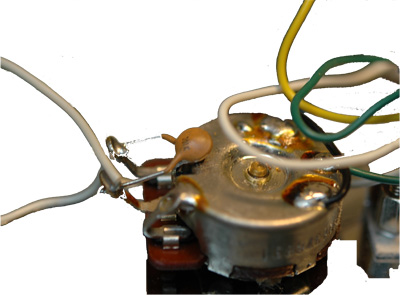
When you can / may open the instrument, you can also check whether the solder joints are still in original condition. The tin should look smooth and as one continuous layer. I think in many cases it is not difficult to see that a soldering iron has been tampered with afterwards
.
Plug

If the cable connector is integrated into the pickguard, it may have caused cracking. The cable may have been (too) tight or the plug has been bumped against something.
See the photo on the right where the damage is such that no one will miss it, but starting cracks in such places will not immediately notice.
Also, while the amplifier is on, move the plug back and forth a little in the jack connection to check if that is causing interference and if there is any play. The connection may then be "dirty" on the inside or it may be a little dismayed.
Body
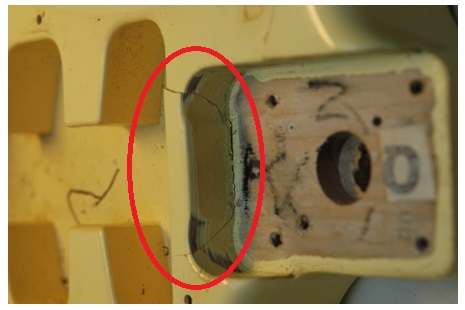
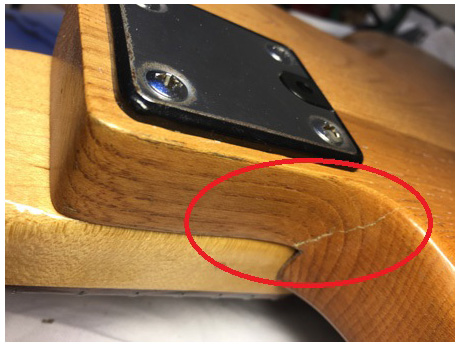 In some cases, instruments with a screwed neck will cause cracks at the place where the recess is located (see photo). That does not have to be a problem when it concerns a superficial crack, which is sometimes only superficially in the paint. You should watch out for deeper cracks.
Plastic bonds around the body may have shrunk, cracked, or loosened over time. This is easy to check by looking closely and feeling the bindings with one hand.
In order to make room for other elements or for other electronics, it may be that wood was once removed inside. When that is done under the pickguard it is not immediately noticeable. Difficult, but the pickguard has to be removed to check this.
In the case of a semi-acoustic guitar, there may be a label inside the cabinet with information about the exact model and sometimes also the serial number. This will then be visible via the F-holes or perhaps the differently shaped recesses.
At several Fenders (from the mid-1970s?) I came across a sticker in the recess for the neck, which also contains the serial number.
Lacquer
You can see if the instrument has been repainted, but it is not always easy to check without disassembling it. Until the end of the 1960s, different / thinner paint was used than the subsequent periods. I once met a collector who, to my surprise, started to smell the paint to determine whether it was the old type of paint. This person also told me that the type of paint can be determined with a blacklight. I don't know about it yet, but I will mention it here as soon as I know more.

Old paint can crack and show a nice pattern with "wrinkles". I have come across something like this with a fairly new instrument, but it turned out that this was caused by someone leaving their guitar in the trunk of the car for a while while it was freezing during those days. I will not talk about brand new "guitars" that already look like they have had a hard life from the factory.
The color can change over the years. Muscle white may look yellowed, for example, and I have owned instruments that once must have been red or blue but now look more brown or green, respectively. Whether there is any discoloration anyway, will come to light when you manage to uncover areas that were covered. With a Fender for example under the pickguard where the color differs from the rest of the body. The discoloration can differ enormously with exactly the same instruments, even if they are from the same year of manufacture. Exposure to, for example, light or smoke already plays a role.
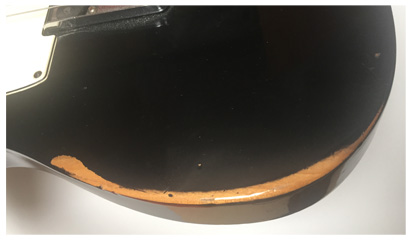 One spot notorious for damage to the paint is the back of the body. After all, a waist belt, zipper or buttons can make deep scratches there. You can also encounter other wear and tear from normal use, but they will be smooth and even and will be found where the guitar body has regular contact with his or her owner.
For the value of the instrument, it appears in practice that the paint is original. In that respect, better a guitar with original but worn and cracked paint, than a perfectly repainted one. When the value is important to you, you should also pay attention to the color. Some colors are rare for a period of time and can greatly increase the value. It is also possible that a color sprayed head increases the price considerably. As long as it is original.
Communicate
The current owner or trader is someone who may be able to provide important additional information. Consider what it can say about the guitar and then immediately put down your findings and see what reaction you "provoke".
But now practice
After you have checked everything, it is time to go ahead. Play on it and you will feel if the guitar appeals to you. When you experience a "click", some of the above points are of minor importance. After all, emotion is not for sale.
Amplifier
I prefer to test an amplifier without an instrument. To what extent an amplifier "disturbs" itself, it is best to determine by turning it on without connecting anything. Then slowly turn the volume towards position 10. Preferably also set the tone controls in full. You can then better hear to what extent the device is hum and noise free.
More to come . . .
| Fender vintage info | http://www.guitarhq.com/fender.html#serial |

